Installation of Crown shaping in your bathroom
Of our bathrooms crown molding? And why not, we have moulding around our doors, Windows and floors, so why so many homeowners feel free to put then molding Crown in their bathroom ceilings. Perhaps because they think that you have to be a master carpenter to install crown molding in their bathrooms. Contrary to belief, you don’t have to be a master of all things wood. You have to know is how to cut your Crown trade secret molding to add classical charm and finesse on the roof of your bathroom. One of the first things that you must realize is that while molding their doors and Windows is flat, molding Crown on the roof of your bathroom bridges really the gap between the wall of the bathroom and ceiling at an angle of 45 degrees. This means that angular edges of Crown boots against the wall and ceiling molding are actually angles of 90 degrees each other until the rear of the molding even does not touch the wall; only the angled edges touch the wall and ceiling by creating a hollow place behind the molding. More complicated to install ing mold Crown in his bathroom is cut joints. This is mainly due to the fact that the bathroom ceiling molding is installed at an angle; Therefore, you can cut flat in a conventional miter box.
“Resumen: installing crown molding adds classic charm to any bathroom limit.””Crown molding is installed at an angle between the wall of the bathroom and create a hollow place behind techo.utilizando molding an angle saw, easily for cutting crown molding is to turn it upside down and backwards, exactly in the way installed on the wall of the bathroom.”
When you purchase of crown molding, make sure that it is perfectly straight with not bend or twist as this makes it very difficult to install. The best grade of molding is called a degree of staining because does not have any knots or defects in the wood and is suitable for finishing clear.You can even get molding that is already prepared and painted so isn’t necesario.Otra important thing to do is leave the molding stand for a day or less at room temperature so the wood can be adjusted to the humidity in your home. It is better for the primes and seal the molding with a coat of paint that will participate less work after install it on your roof.
You can actually determine to what extent out of the wall and ceiling molding will fall by placing the molding of a square framing to find customized.Then select the distance at several points along the wall of the bathroom ceiling to keep a straight install of especially if the wall of the bathroom runs parallel to the roof beam note corona.Como molding, you cannot use framing nail members of the roof molding. Then attach some blocks buttons nailing triangular, so you can use as a base to attach to the wall. Just try to leave at least a quarter of an inch space between crown molding and the block to any game
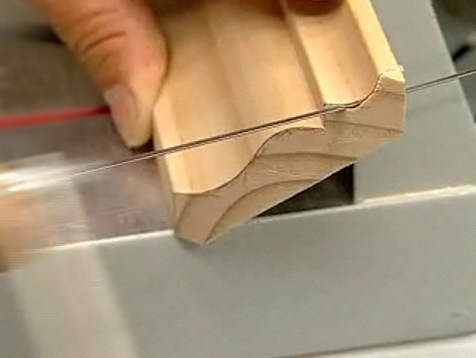
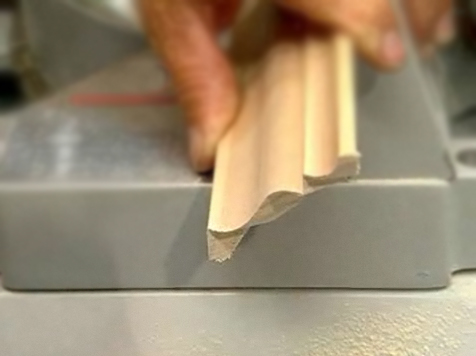
Using an angle saw, easily for cutting crown molding is to turn it upside down and backwards, exactly in the way it could hang on the wall of your bathroom. This way you can easily limit it against the plate of the Sierra and support (fence) to make a precise cut. Set the molding on the fence, ensuring that the top bevel is flat with the bottom of the table de la Sierra. To make the interior cut cut of cope, adjust the Sierra to cut the molding in an angle of 45 degrees. Basically an interior corner requires two different kinds of cuts. First is a shoe cut (or square cut) and second is an interior court miter. When you have two cuts square corner, two molding parts do not fit correctly. So you have to do is you need to create one to tackle cut by which joint fits very well and this is done with a Sierra cope with flexible hand. To the two pieces of molding to fit into the inside corner you have to remove wood in the rear part of the vanguard of a piece of the corner molding, this is called a cut of cope.To better follow the edge of the molding when you undermines, should darken the edge with a pen so that the edge will make it easier for ver.Luego take the Sierra to deal to cut under and over the edge to remove the excess wood in the back of the edge of the molding. The great thing about a saw to deal with them is because it is so thin; You can easily bend to the Court of the edges of the curved bezel of crown molding. Once this is done to soften the edges with a smoother adjustment sanding paper.
Now its time to install crown molding in your bathroom; his best start with the wall opposite the door of the bathroom. To begin, cut cut squares on both ends of the first piece length crown molding. Holding the molding in place, so nail nails of wall and ceiling beam. When you arrive at the corner, a piece of molding cut square and you need to deal with cut another part for a good fit.As mentioned earlier start with an interior court miter.Remember if the cope is on the left edge of the Crown moulding per piece, below, the Court will be on the right.A common practice is to test the Court against a piece of scrap metal molding tune borde.Una time has master which, continue along the walls of the bathroom.Make cuts square on the edge of crown molding and support cuts at the other end.Finally, at both ends of the last final note pieza.Como wherever create miter short mainly are doing all the contrario.La molding remained in the Sierra de miter mouth down and backwards, the only difference is that the Court is angled in the opposite direction than mentioned previously.
To minimize and reduce signs of splice your mold pieces together, decorative boxes can be put on the places where the adjacent moldura.Tales places as inside and outside corners (because some of the rooms are totally square) pieces come together and half way long extends wall bath where you have no other option but to splice two-piece cast juntos.Si don’t want to use to hide joints decorative boxes, you can add small drops of tail fill cracks, timber or wood when it is dry sand or excess files toward down and paint envelope to hide the articulation.
Browse through these useful categories on classic moulding its fourth best design bathroom remodeling bathroom explained to you, the trending of bath from all angles and recommended current bathroom product reviews to help you get started with the bathroom remodeling bathroom renovation techniques.
Install just to Bathroomguru review